Asterisk Linux Debian – voip-info.org
Asterisk Linux Debian
Asterisk on Debian GNU/Linux
Debian GNU/Linux is a very nice Linux distribution and can be found at http://www.debian.org/.
If you are not familiar with Debian, check it out. It is a fantastic server platform, specifically for it’s ability to be remotely upgraded – even between versions.Asterisk from source for Debian Etch
Related installation guides:
- http://planet.zakotel.com/wiki/index.php?page_id=18 – OUTDATED, see packages section below
- http://www.itinfusion.ca/asterisk/howto-installing-asterisk-on-debian-etch/, including running asterisk as non-root user
Or if you just want to install plain Asterisk 1.4, you can first do:
apt-getinstalllinux-headers-`uname-r`bisonopenssllibssl-devlibeditline0libeditline-devlibedit-dev
apt-getinstallgccmakeg++php5-climysql-commonlibmysqlclient15-devlibnewt-dev“php-cli” is here for PHP-AGI implementations, “mysql-common” and “libmysqlclient15-dev” are the dependencies needed to build mysql support, “libnewt-dev” is needed by zaptel to compile zttool. NONE of those are required to build asterisk but are needed for full blown installation.
Optional packages
After doing ‘make menuselect’ in the Asterisk directory (see below) you might find one or more options to be greyed out. Here’s a list of packages that can fix this – don’t forget to run another ‘./configure’ before doing another ‘make menuselect’!
- libspeex1 (possibly also libspeex-dev and speex) for the speex codec and translations from/to it
- libvorbis-dev for Ogg Vorbis sound file support
- libcurl3-dev for the CURL() function
- unixodbc (possibly also unixodbc-devel and e.g. libmyodbc) for CDRs, ODBC functions and ODBC voicemail
- SQLite if you’d like to use that instead of MySQL or Postgres
- mysql-server if you’d like to run a MySQL server on the same box
- php5-mysql: PHP package to allow it to interface with MySQL (since we already started out with php-cli and mysql …)
- jabber/XMPP/jingle/gtalk: Research the current requirements (for chan_gtalk etc)
Entirely unnecessary but useful tools
- vim (replaces vim.tiny and therefore gives you full syntax highlighting of Asterisk .conf files when you do “:syntax on” in vim)
- sox (tool for the codec conversion of audio files)
- nmap (scan your network for hosts and ports)
- ngrep (grep for network traffic)
- iftop (displays bandwidth usage information on an network interface)
- iptraf (Interactive Colorful IP LAN Monitor)
- elinks (text web browser)
- lynx (text web browser)
Then get the latest sources of zaptel, libpri, asterisk and asterisk-addons from digium, untar them (tar zxvf packagename.tar.gz) and install them in the order:
zaptel
./configure
make
makeinstall
makeconfigmodprobeztdummy(useztdummyonlyifyoudonothaveanyzaptel/Digiumhardware!)
vim/etc/modules(addztdummytothelist,save&exit)
update-modules(updatesthesystemtoensurethatztdummyisrunningafterareboot)libpri
make
makeinstallasterisk
./configure
makemenuselect(thisisoptional)
make
makeinstall
makesamples(useonlyforafreshinstall,mightoverwriteyourconfig!)
makeconfig(toinstallrunscriptsatboottime)asterisk-addons
./configure
(nowadd’ASTCFLAGS+=-DMYSQL_LOGUNIQUEID’to’Makefile’ifyouintendtouseMySQLforCDRs!)
makemenuselect(thisisoptional)
make
makeinstall
makesamples(useonlyforafreshinstall,mightoverwriteyourconfig!)Now start Asterisk the first time with asterisk -vvvgc and look for error messages in the CLI that you might want to attack. Note that you might have to change your putty settings (a Windows SSH client) such that your ‘lines of scrollback’ is set to 2000 or higher in order to be able to see all warnings and errors. Terminate Asterisk with stop now.
In case of error concerning realtime you could consider to disable it at least temporarily by editing /etc/asterisk/modules.conf and adding the two following lines:noload=>pbx_realtime.so
noload=>app_realtime.soAsterisk Packages
There are several Debian packages (installable with dpkg or apt-get) available:
- Current Packages – Debian Official
zaptel – Debian experimental zaptel-source – Debian experimental libpri – Debian experimental Look for the rest soon Debian source for experimental: deb http://ftp.us.debian.org/debian/ ../project/experimental main
- Current Packages – Other
Xorcom’s : deb http://rapid.dotsrc.org/ experimental/ These are based on debian code
peen.net’s : deb http://debian.peen.net asterisk/ These are backports from Unstable to Sarge
(proformatique) xivo.fr’s : deb http://xivo.fr debian/ Backports from Unstable to Sarge with Asterisk1.2.16
Asterisk-addons1.2.5
Zaptel1.2.15
Newfrenchprompttranslation
Chan-capi0.7.1
Openser1.1.0
Res-SQLITE2
Asteriskh323ZaKoTel Etch Packages (asterisk v1.4.19.1, x86) debhttp://packages.zakotel.com/debianetchmain
ZaKoTel provides Asterisk & ZapTel 1.4 (+ kernel drivers for original x86 Debian kernels) packages for Debian Etch inside their repository, their packages include the recent BriStuff patches as well as app_rxfax and app_txfax for fax handling. A HowTo for integrating the repository into apt can be found here.
- Sarge Packages (asterisk v1.0.7)
asterisk
asterisk-app-dtmftotext
asterisk-app-fax
asterisk-chan-capi
asterisk-config
asterisk-dev
asterisk-doc
asterisk-gtk-console
asterisk-h323
asterisk-oh323
asterisk-prompt-de
asterisk-prompt-fr
asterisk-prompt-se
asterisk-sounds-main
asterisk-web-vmail
zaptel
libpri*
in Debian. Note that they include the bristuff patches.Packages Needed
There are a number of packages needed before Asterisk building Asterisk from source.
From the Asterisk download page at Digium:Note that your system MUST meet these requirements:
You must have openssl and the respective development package (libssl-dev?).
You must be running Linux 2.4.x (or 2.6.x)
You must have the Linux Kernel Sources package installed on your system.(or Kernel Headers)Alternatively, use the command: apt-get build-dep asterisk
Note that Debian tends to break packages into smaller pieces than other distributions, so there are more ‘required’ packages here than with RedHat or others.
Some package names are also tied to particular versions of the software, especially libraries. This allows you to install multiple versions of the same libraries, and to have different packages use their prefferred verision. That said ‘apt-cache search’ is your friend.
Finally, this is what worked for me… Your system may be configured differently, and I may have installed more than I needed to. YMMV -JP (:biggrin:)
Here are the packages under Debian (as of 2003-11-22):Required
- kernel-headers-`uname -r` (NOTE: newer versions may require linux-headers-`uname -r`)
- bison
- openssl
- libssl0.9.7: (Note that version may change – do: apt-cache search libssl)
- libssl-dev
- (libreadline4 – not required anymore, asterisk brings “editline” along)
- (libreadline4-dev – not required anymore, see above)
- libeditline0
- libeditline-dev
- libedit-dev
- libedit2
- libncurses5
- libncurses5-dev
- zlib1g-dev (Note: needed for cvs head)
Recommended
- svn: To download the newest cvs source, or course…
- Outdated! cvs: To download the newest cvs source, or course…
- minicom: to configure your channelbank via serial
- festival: To speek text programatically
- doxygen, graphviz: to build the html Asterisk API documentation with ‘make progdocs’
Just a quick note –
if you upgrade your kernel, copy the config file that comes with the .deb file, (it gets placed in /boot) to /usr/src/linux or /usr/src/linux-2.4 (cp /boot/config-2.4.25-1-686-smp /usr/src/linux/.config) then do a “make oldconfig; make dep” zaptel will compile just fine if everything else is ok..
The kernel-headers Package
There is no need to install the complete kernel-source package. Simply install the appropriate kernel-headers package for your current kernel, and make sure that /usr/src/linux links to them.
Zaptel unresolved symbols problems
While trying to install the zaptel module with ‘make install’ I have gotten error messages of the form
Unresolvedsymbols…
To solve this problem, do not download the kernel-source as suggested above, instead download the correct kernel-headers package (type uname -a to find out which one) and create a softlink withln -s /usr/src/kernel-headers-… /usr/src/linux (e.g. ln -s /usr/src/kernel-headers-2.4.27-2-686 /usr/src/linux)
Now compile the zaptel driver and ‘make install’ to install it.
Help With Compiling Zaptel: Debian with a custom kernel
If you are using Debian and a custom Debian kernel, note that the kernel Makefile in (/usr/src/linux/Makefile) may not have the correct EXTRAVERSION variable.
If you still get a kernel-version mismatch error after following the Zatptel Installation Instructions, try looking in the Makefile to make sure that the version information there matches what is returned by ‘uname -r’. If not, edit the Makefile and try the process again.
Alternatively, you could use the zaptel-source debian package and the wonderful module-assistant:
apt-getinstallzaptel-source
m-abuildzaptelSome tips for working with Asterisk on Debian 3.1/Sarge with Kernel 2.6:
- Check that your TDM400 is not sharing any IRQs – use cat /proc/interrupts to check (you’ll need to have the wctdm driver loaded).
- You’ll need the zaptel-source package to compile the (wctdm, wcfxo, wcfxs) drivers for your running kernel. As long as you’re running a stock Debian kernel, this should be quite easy. Hint: you need the EXACT kernel-headers-* package to match your current running kernel. If you get “wrong magic” errors when trying to insmod the wctdm driver, then you’re compiling with the wrong kernel-headers directory symlinked to /usr/src/linux.
- If you run ‘make linux26’ (as instructed for those running 2.6 kernels) to build the zaptel drivers in /usr/src/modules/zaptel, ‘make install’, and then try to insmod them only to find that Asterisk cannot open the zap channels anyway – try doing ‘make’ instead (without the ‘linux26’ bit). I’m running kernel-image-2.6.8-1-386 and for some reason a dist-upgrade/kernel-upgrade/reboot the other day now makes my zaptel modules useless if I do ‘make linux26’. Odd. ( Note that this shouldnt make any difference as the makefile will automatically detect the kernel version and adapt )
- Don’t forget to insmod wcfxo and wcfxs. If you have only FXO modules you’ll need FXS signalling and hence the wcfxs module; and vice versa. It’s harmless to just do both even if you only have one type of module installed on your card.
- Don’t forget to install the zaptel package for the userland tools, which includes the ztcfg utility.
- It seems that, there is an issue where Asterisk can’t open the zaptel channels when launched through the init.d scripts as the asterisk user because the asterisk user doesnt have permission to access the device… so make sure you add asterisk user to the dialout group using ‘adduser asterisk dialout’.
- Don’t forget to use signalling=fxs_ks in your zapata.conf so that your FXO module can detect remote end hangup reliably.
- Want to be able to pickup a line even if it isn’t ringing? Perhaps it’s just me but I got confused thinking that the zapbarge Asterisk command would be what I wanted. Of course, the solution is much simpler.
Below are some lines out of my extensions.conf that allow anyone on a SIP phone (or other) to pickup a PSTN line by dialing *X, where X is the line number (1-3). This is useful for when you still have analogue phones sharing the same lines that are going into your TDM400 card, and you want to be able to pickup a line that has already been answered with an analogue phone.
[zaplines]
exten=_*1,1,Dial(Zap/1/)
exten=_*2,1,Dial(Zap/2/)
exten=_*3,1,Dial(Zap/3/)Step by step TDM400P on Debian 3.1/Sarge with Kernel 2.6:
- Install Debian 3.1/Sarge with Kernel 2.6 ( well DUH )
- apt-get install zaptel-source
- apt-get install kernel-headers-`uname -r`
- apt-get build-dep asterisk
- m-a a-i zaptel
- you need to set an opermode if you live outside of the us so edit /etc/modprobe.d/zaptel (Australia used as example)
install wcfxo /sbin/modprobe –ignore-install wcfxo opermode=AUSTRALIA && /sbin/ztcfg
install wcfxs /sbin/modprobe –ignore-install wcfxs opermode=AUSTRALIA && /sbin/ztcfg
- and edit /etc/zaptel.conf (Australia with Module 1-2 FXO and 3-4 FXS used as example)
loadzone = au
defaultzone=au
fxsks=1-2
fxoks=3-4
- modprobe zaptel
- modprobe wcfxs (to support the FXO modules)
- modprobe wcfxo (to support the FXS modules)
-NOTE: If modprobe does not see your new modules, claiming the are not found, run ‘depmod’
and your done… (:wink:)
IVR Audio problems (kind of robotic voice) on TDM400P PSTN channels with Debian 3.1/Etch (testing) on Intel P4 based cpu/s:
(Assuming that you already followed the steps above)
Since kernel 2.6 uses an internal timer, this could be related to the “wrong” kernel image for the CPU installed in the system.
The default Debian 3.1/Etch kernel image is linux-image-2.6.12-1-386 (now its 2.6.18-4)So, if you are using P4 based cpu/s try to:
- apt-get update
- apt-get install linux-image-2.6.x-x-686 (in my case “linux-image-2.6.12-1-686”)
- apt-get install kernel-headers-2.6.x-x-686 (do this after the image installation)
- reboot. The new kernel will be automatically loaded (check if it is present in the grub/lilo list anyway)
- ignore the asterisk errors, if present
- login to a secondary console (eg: alt+F2)
- m-a a-i zaptel (which rebuilds the zaptel driver, not started after the reboot)
- reboot
and that’s it.
You don’t need to modprobe again nor reconfigure anything.Zaptel /dev permissions
I finally figured out what was wrong with ztdummy after compiling it 2 or 3 times. I read on a thread (http://asterisk.linkx.net/asteriskusers/200409/msg03834.html) that Debian runs as a different user or something, so I chown’d /dev/zap/pseudo to asterisk:root and viola everything started working.
See Also
- Tony Wasson’s Installing Asterisk on Debian Stable
- Boris von Loesch’s Installation der Asterisk PBX unter Debain Sarge mit Digium TE110p PRI Card
- Martin List-Petersen’s Building the zaptel modules Debian style
- MikeOverIP’s Asterisk Compilation and Installation on Debian Etch (from sources)
- Linux Debian: Debian Linux general information
- http://www.debianhelp.co.uk: Debian Linux help
- Asterisk OS Platforms
- Running Asterisk on Debian
- Asterisk Linux Ubuntu
Photobucket
Photobucket
Photobucket is the most popular site on the Internet for uploading, sharing, linking and finding photos, videos, and graphics. Your free Photobucket account can store thousands of photos and hours of video. Photobucket also offers free tools for making slideshows of photos, videos with music. You can share your photos and videos with friends by email, IM and mobile phone. Plus, you browse through Photobucket’s huge online library of photos and videos to find the latest and best photos, images and videos. Finally, Photobucket’s online store lets you print pictures, as well as add them to shirts, hoodies, mugs, calendars, stickers, wall posters and more.
Photobucket was founded in 2003 and acquired by Fox Interactive Media, Inc., a division of News Corp. (NYSE: NWS) in July 2007. The company is headquartered in Denver, Colo. with offices in Palo Alto, Calif.
For the latest news and announcements, visit his blog
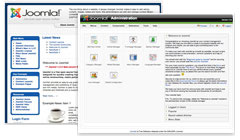
Joomla
Si estás en la búsqueda de un sistema dinámico de contenidos para tu sitio, encontrarás una excelente opción con Joomla!, un CMS robusto, personalizable y escalable. El presente artículo te permitirá tener una panorámica sobre el tema.
 De los miles de CMS existentes en la actualidad, sólo unos pocos realmente están llevando la web a una nueva era de agilidad en la inclusión de contenido, estímulo de la comunicación colectiva y reconocimiento al usuario como generador de información útil, en lugar de simple “tragador” pasivo de artículos y noticias.
Desde su aparición al público, Joomla! ha avanzado a pasos agigantados, siendo uno de los líderes en la lista de los mejores CMS, aún por encima de aplicaciones comerciales.
Orígenes de Joomla!
A mediados de 2005, los administradores del equipo de desarrollo de Mambo (CMS antecesor de Joomla!) decidieron limitar las condiciones de la licencia de uso de su software. 
Ante tal hecho, los principales desarrolladores de la organización estuvieron en desacuerdo y fue así que más de 30 miembros principales del equipo renunciaron de inmediato y fundaron Joomla!® una palabra de origen africano que significa “todos juntos”, un CMS que funcionaba con el núcleo de Mambo, pero con cambios importantes en el código y lo mejor de todo es software libre.
No sólo los desarrolladores de Mambo migraron al nuevo proyecto; miles de colaboradores, diseñadores y comunidades enteras lo respaldaron desde un principio, sobre todo al difundirse la noticia de la acción ejecutada por Mambo y sus propietarios.
De esta manera el proyecto Joomla! tomó aún más energía, llegando a ser la aplicación web que hoy conocemos, no sólo con excelentes características de gestión integral, sino con un futuro bastante promisorio en el ámbito de la Web 2.0.
En el presente, el fenómeno Joomla! representa más que la existencia de una aplicación web de avanzada. Es la demostración palpable de la superioridad que puede alcanzar el software libre cuando está presente el esfuerzo común, activo y organizado de una numerosa comunidad global.
Joomla! ¿Un sistema seguro?
En términos objetivos, nada que esté publicado en la web puede considerarse completamente seguro. Si han violado sistemas tan complejos como el de la Fuerza Aérea norteamericana, poco queda para el resto del contenido de internet.
Ahora bien, si nos plegamos a lo que la generalidad entiende como “seguridad en internet”, Joomla! es uno de los escasos CMS que cuenta con la suficiente participación activa como para generar soluciones precisas en el menor tiempo posible ante los bugs/vulnerabilidades que se vayan descubriendo.
Esto de la seguridad no es un mal exclusivo de Joomla!; otros CMS han caído bajo el yugo de los ataques y muchas veces la solución llega demasiado tarde.
¿Es difícil comprender el sistema Joomla!?
 Ante tal pregunta surgiría otra: “¿Comparado con qué?”. Es probable que sistemas más simples en su arquitectura (como WordPress o Drupal*) exijan menos tiempo que Joomla! para aprender a moldearlos a gusto.
Sin embargo, para un desarrollador resulta muy atractiva la robustez en las funciones de una aplicación, ya que con ello puede agregar más puntos de calidad integral a sus trabajos.
Si tu objetivo es dominar el sistema de Joomla! con la finalidad de alcanzar un nivel satisfactorio de personalización, deberás pasar por la etapa obligatoria de acumular algunas “horas de vuelo” con HTML, PHP y (si se quiere dar buenos condimentos de usabilidad al resultado final) Javascript, sin olvidar la importancia de los fundamentos de Diseño.
En cuanto al procedimiento, no importa el que utilices para sentirte cómodo(a) a lo largo de tu aprendizaje con el sistema Joomla!, con tal observes una regla importante: mantén tu método simple. Si lo complicas, el proceso se te hará cuesta arriba.
*Mencionamos a WordPress y Drupal porque al igual que Joomla!, sus sitios oficiales ofrecen abundante documentación de desarrollo, un aspecto decisivo para el estudio e investigación de determinada aplicación.
Comenzando con Joomla!
En principio es bueno saber cómo están organizados los distintos elementos que intervienen en Joomla! y cómo actúan para devolver los resultados esperados.
Cuando un usuario escribe o hace click en nuestra dirección web, el index.php inmediatamente “llama” a la plantilla que estamos usando:
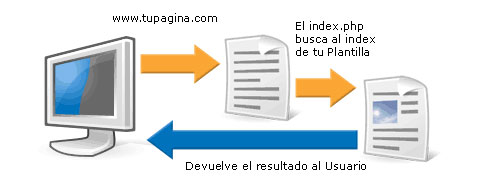
En el index de la plantilla se encuentra buena parte de la información de estructura de la web, y casi toda la información de los estilos. No toda la estructura se controla desde la plantilla porque ésta, a su vez, “llama” a los elementos que el diseñador incluyó con anterioridad.
Es decir, si en la plantilla se requieren módulos, entonces aparecerá el Módulo específico que originalmente se encuentra en su directorio y ahora se refleja en el sitio. Igualmente sucede con los Componentes.
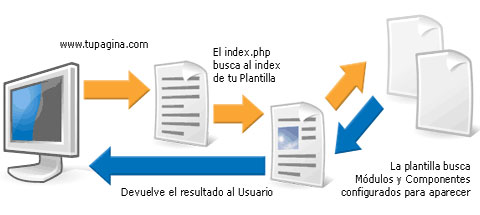
Todo Módulo y Componente tiene insertada su propia estructura HTML, así como instrucciones PHP particulares para cada caso, y algunas veces hasta su propia hoja de estilos CSS. Los Módulos están en el directorio /modules/ y los Componentes en /components/. Puedes probar personalizando el Módulo que más te guste con tus propias etiquetas y opciones de configuración, ya que cada Módulo tiene sus parámetros en un archivo XML.
Lo anterior constituye una explicación muy básica (quizás haga falta otro artículo más técnico y específico al respecto), pero ahora sabes que la “compleja estructura” no es tan compleja; un archivo llama a otro y todo se refleja como HTML a la vista de tus visitantes.
Otras lecturas:
Acerca de Facebook
Facebook es una herramienta social que conecta personas con sus amigos y otras personas que trabajan, estudian y viven cerca de ellos. La gente utiliza Facebook para mantenerse al día con sus amigos, subir un número ilimitado de fotos, compartir enlaces y videos, y aprender más sobre las personas que ellos conocen.
Cualquiera puede unirse a Facebook
Todo lo que se necesita para acceder a Facebook es una dirección válida de correo electrónico. Para conectarte con colegas de trabajo o compañeros de clases, regístrate usando la dirección de correo electrónico de tu trabajo o escuela. Una vez que te registres, únete a una red regional para conectarte con personas en tu área.
Descubre la gente a tu alrededor
Facebook se compone de muchas redes, cada una formada en torno a una compañia, región o escuela. Únete a las redes que reflejen las comunidades en tu vida real y aprende más sobre aquellos con quienes trabajas, vives o estudias.
Hacer más
La Plataforma de Facebook permite a cualquiera, en cualquier lugar, construir aplicaciones completas que puedes elegir utilizar. Las posibilidades son infinitas. Define tu experiencia en Facebook eligiendo las aplicaciones que son útiles y relevantes para tu mundo.
Dejarlo privado
En Facebook, creemos que la gente debería controlar cómo quiere compartir su información y quién puede verla. La gente sólo puede ver los perfiles de los amigos confirmados y de la gente de sus redes. Puedes usar nuestros ajustes de privacidad en cualquier momento para controlar quién puede ver qué en Facebook.
Announcing openSUSE 11.0 Alpha1
openSUSE News » Announcing openSUSE 11.0 Alpha1
With the new year beginning we kick start major development into the next version of openSUSE: openSUSE 11.0 (roadmap). A very early alpha version, Alpha 1, is now available for download and testing.

More screenshots are available at The Coding Studio
Despite many other products being developed in parallel to Factory, we have seen a heavy stream of development on it, so it is really worth a try if you have time for testing. Note, however, that it is not suitable for production systems.
Changes since openSUSE 11.0 Alpha 0
We have seen 1026 package check-ins since Alpha0 and countless bugs fixed. The main changes against Alpha0 are:
- Sat Solver integration
- Michael Schröder’s “sat solver” library is now the default package solver for libzypp, so make sure you doublecheck the selected packages – there might be suprises ahead. Please note that we need test cases for things that look funny to you (wiki link)
- Heavy changes to the appearance of the Qt installation (ported to qt4)
- Note that it’s still in draft state and your feedback is welcome
- KDE 4.0.0
- perl 5.10
- glibc 2.7
- NetworkManager 0.7
- CUPS 1.3.5
- Pulseaudio
Most Annoying Bugs
Due to the huge amount of changes, there are also several noticeable bugs:
- The new solver does not yet have a “ignore this requirement” choice, i.e. it’s not possible to create a broken system. We’re still discussing if this is a bug or a feature

- the CDs lack a huge amount of software. Many packages had to be taken out to make way for others. The CDs should still have a a completely working desktop, however.
- the Qt port and its theme are early releases and create noticeably more flickering and drawing glitches, e.g. the progress bar is only visible on some installations
- jpackage packages are broken and one package will complain during installation – just ignore
- the installation crashes at the end when creating the x11 proposal: in this case, your desktop will still have a working X config, it just might not be the perfect one. You may need to call sax2 after it happens
- PPC cannot be installed as the bootloader config can’t be written out. However, you can get a working PPC system when updating from alpha0
Media and Download
Please refer to software.openSUSE.org/developer for direct links to all the available media.
Have a lot of fun!
This entry is filed under Distribution. You can follow any responses to this entry through the RSS 2.0 feed.
Build Service – openSUSE
Build Service – openSUSE
The openSUSE Build Service is an open and complete distribution development platform that provides infrastructure for a development of the future openSUSE distributions.The service provides software developers with a tool to create and release open source software for openSUSE and other Linux distributions easily on different hardware architectures and for a broad user audience. Users can easily find the latest open source packages they are looking for and customize them. It provides a bridge between developers and users with feedback and rating functionality. For developers it is an efficient place to build up groups and work together through its project model.


Que ofrecemos
Información de Contacto
Heredia, Costa Rica, 40102
+506 6048-6672
info@blackdiezone.net
Lunes a Sabado: 8:00 am - 5:00 pm
Domingos: Cerrado